
Keep Your Edge: A Fall Guide to Garden Tool Care
By fall, garden tools carry plenty of evidence of a productive season. Pruners collect dried sap. Loppers start feeling stiff. A favorite pair of shears gets tossed into the shed with the sincere intention of dealing with it later. Then spring arrives, and later is suddenly now.

As harvesting slows and rainy weather settles into Southwest Washington, tool care is a satisfying job to move under cover. Cleaning, inspecting, and sharpening tools before storage gives you time to address problems while the next big garden project is still comfortably in the future. Washington State University's Extension Gardener program recommends this seasonal attention before tools go away for winter. [1]
You can start with the tools you use most. A sticky pair of pruners may need cleaning and adjustment before it needs replacing. The goal is dependable equipment that cuts cleanly and feels comfortable to use.
Start with the right tool for the job
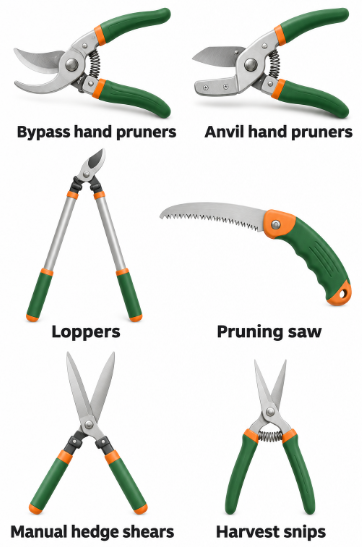
Tool care begins before cleanup. Cutting material that is too thick or hard for a tool can force its blades apart, damage the edge, and leave ragged plant tissue. Hard, dry wood can demand more force than a fresh stem of the same diameter. If hand pruners require twisting or two hands to complete an ordinary cut, stop and choose a more suitable tool. A cutting-capacity rating is a limit to respect, rather than a target to reach with every squeeze. Choosing the right size and blade design protects both the plant and the tool. [2,3,4]
Use the chart below as a starting point. Your tool's stated capacity and instructions take priority over these approximate sizes
Tool | A suitable job | A limit worth remembering |
Bypass hand pruners | Live stems and small woody growth, commonly around 1/2 to 3/4 inch thick | The cutting blade passes a supporting hook. Stop if the stem will not fit properly or the blades twist apart. |
Anvil hand pruners | Small, hard or dead stems within the model's rating | The blade closes onto a flat support. This action can crush tender living tissue. |
Loppers | Branches beyond comfortable hand-pruner capacity, often up to about 1 1/2 inches | Longer handles provide leverage; they do not make every branch a suitable cut. |
Pruning saw | Branches too large or difficult for pruners or loppers | Follow the saw's cutting direction. Many pruning saws cut on the pull stroke. |
Manual hedge shears | Shaping hedges by clipping soft growth and thin stems | Long blades are for shearing many small tips, rather than cutting substantial branches. |
Harvest snips | Herbs, flowers, and delicate stems needing a precise cut | Their narrow blades are not a substitute for woody-branch pruners. |
Tool choice deserves its own longer conversation. For this maintenance session, notice which tools struggled during the season and whether their condition reflects wear, poor adjustment, or a job beyond their design. [2,3,4,12]
Gather a simple maintenance kit
A brush, dish soap, clean rags, and a suitable lubricant cover much of the cleaning. An old toothbrush reaches around a pivot or spring. For sharpening, add eye protection, protective gloves, a secure clamp or vise, and a file, stone, or diamond hone suited to your blade. A file with a pointed tang needs a proper handle. [8]
Look up the model's care instructions before starting. Some tools come apart for servicing; others should stay assembled. If disassembly is recommended, photograph the arrangement first and keep small parts together. [5]
Clean enough to see what needs attention
Begin by brushing away loose soil and plant fragments. Wash suitable cutting surfaces with warm, soapy water, then dry thoroughly. Work around the joint, spring, and places where blades overlap. Removing grime makes it easier to judge the edge and spot alignment problems. [5,6]
Pay attention to what the tool has been doing. A soil-covered spade needs a different cleanup from sap-coated pruners. A brush that removes mud effectively may be too abrasive for a coated cutting surface. Follow the manufacturer's recommendations for finishes and cleaning products.
What you find | A useful first step | What to avoid |
Loose soil and plant fragments | Brush off debris, wash as needed, and dry | Putting the tool away with damp material still attached |
Sticky sap or resin | Use a compatible resin remover and wipe clean | Scraping so aggressively that you gouge metal or damage a coating |
Light surface rust | Use a gentle abrasive appropriate for the surface | Stripping a protective finish while chasing every discoloration |
Material from a diseased plant | Remove debris, then use an appropriate disinfectant | Assuming a blade is disinfected because it looks clean |
Moisture around joints or handles | Wipe thoroughly and allow remaining moisture to dry | Closing a wet tool inside a case or crowded storage bin |
For light rust, suitable fine steel wool or another recommended abrasive may help. Deep pits, cracks, and substantial corrosion need closer assessment. Removing the orange color cannot restore metal already lost to damage. [6,9,10,11]
Inspect the whole tool
Once the surface is clean, slowly open and close the tool. Does the spring return the handles smoothly? Is the pivot loose? Do bypass blades pass closely, or is there a gap that allows a stem to fold between them? Check the catch and grips as well. [6]
A tool that crushes or catches may have an adjustment problem, even when its edge is sharp. Tighten or adjust hardware according to its instructions. Excessive tightening can make movement difficult; looseness can interfere with the way the blades meet. [10]
Set aside cracked parts or visibly bent blades for repair or replacement. Check whether the manufacturer offers the particular blade, spring, or other component you need. A replaceable part may solve the problem without replacing the entire tool. Sharpening alone will not correct a damaged mechanism. [6,12]
Understand the edge before sharpening
A bevel is the sloping strip of metal leading to a cutting edge. Sharpening should restore that existing shape. Grinding a new angle into a blade can change how it meets its partner and remove useful metal unnecessarily. [5]

Bypass pruners and loppers generally need sharpening on the beveled face of the cutting blade. Preserve its flat back and the supporting hook.
Anvil tools vary: some cutting blades have bevels on both sides, while others have one.
Follow the original design and leave the anvil support alone. [4,7]
Smooth-bladed manual hedge shears typically have an outer bevel on each cutting blade. The flat inner faces must continue to slide together correctly. Serrated edges and specialty designs require their own instructions. [7]
Pruning saws need separate attention, too. Some hardened replacement blades are not intended for resharpening. Check before trying to file the teeth; professional service or a replacement blade may be the appropriate choice. [12]
Sharpen with patience and a steady setup
For ordinary smooth-edged manual pruning tools, a careful touch-up can be manageable at home. Start with the manufacturer's procedure and a clean blade. Choose a well-lit work area where the tool can be held securely without interruptions.
Secure the tool. Wear eye protection and protective gloves. Use a clamp or vise without crushing the mechanism or bending a thin blade. Keep your supporting hand away from the cutting edge.
Match the existing bevel. Place the appropriate sharpener against the sloping face. Maintain that contact rather than rocking to a different angle with each stroke.
Use light, controlled strokes. Follow the blade's curve. A conventional file cuts on the forward stroke; lift it on the return. Follow the directions for your stone or hone, including whether it needs water or oil.
Inspect frequently. Remove only enough metal to restore the edge. A badly notched or misshapen blade may need skilled attention instead of more enthusiastic filing.
Address the burr carefully. Sharpening can leave a tiny lip of metal on the reverse side. Where the manufacturer allows it, a fine hone held flat can remove that burr. Do not create a second bevel on a surface meant to remain flat. [5,7,8]

If maintaining the angle feels uncertain, seek a demonstration or sharpening service. Learning on a sound, familiar tool is more useful than trying to rescue a severely damaged blade by guesswork.
Treat cleaning and disinfection as separate steps
Soap and a brush remove visible grime. Disinfection addresses microorganisms that can remain after that grime is gone. Soil and plant debris can interfere with disinfectants, so cleaning comes first. [9]
For routine care of hand-pruner blades, University of Minnesota Extension describes wiping, dipping, or spraying with 70% isopropyl alcohol. Let the blades dry before use and keep alcohol away from flames. Follow product directions, including any required contact time. Do not mix cleaning chemicals. [9]
Disease-specific instructions matter. Alcohol may not adequately disinfect tools used on apple trees with fire blight. If disease is suspected, consult Extension guidance for that particular problem. Clean and disinfect after working on infected plants and before moving on, and when bringing tools home from another garden site. [9]
Lubricate and test before putting tools away
After the tool is clean and dry, apply the lubricant recommended for its moving parts. Work the handles gently to distribute it through the joint, then wipe away excess. A thin protective film on exposed metal can help limit rust during storage; a dripping coating is unnecessary. [10,11]
Reassemble any removed parts and check the adjustment. Test on suitable material comfortably within the tool's capacity. The handles should move smoothly, and the cut should finish cleanly without pulling the last strip of tissue apart. If it still catches, reassess alignment, sharpness, and tool choice. [5,10]
Give handles their share of attention. Check wood for rough spots, splinters, or cracks. Sand minor roughness and renew its protective finish with a suitable product according to the directions. Replace an unsafe handle rather than relying on a fresh coat of oil to repair it. [5,10]
Give tools a dry home and an easier next season
Choose a clean, dry place for storage, with tools secured on hooks, a rack, or a shelf. Keep wooden handles off soil and damp concrete. Let tools dry before closing catches or putting them in their cases, and use blade covers where provided. [10,11]
This is also a useful moment to make a short repair list. Record the model number, the part needed, and anything that deserves a closer look before the next workday. If tools are shared, identify equipment awaiting repair so it does not accidentally go back into use.
Keep a brush and rag near the storage spot to make cleanup convenient. [11] When equipment returns from a gleaning event or garden work party, a quick check can catch a missing spring or sticky joint while someone still remembers what happened.

The process can be time consuming, but a little time now means your tools will be clean, sharp, and ready when the garden needs them again this spring.
Sources and further reading


Comments